All Ages
Comprehension Question Game
Learn about: Literacy
Materials: Device with internet access, die to roll, paper, pencils
This reading activity is great for children of all ages to build literacy and comprehension skills. The game involves listening to a story and then asking and answering questions about that story.
Pick a story to listen to on Story Line's website. All stories are read by famous people.
Once you agree upon a story, follow these easy steps and let the fun begin!
- Choose a story.
- Each player rolls the die to decide what kind of question they will ask the other players.
- If you rolled a 1: While watching and listening to the story, prepare a question that starts with ‘What’. For example, ‘What did the family do after they decided to move from their home?’
- If you rolled a 2: While watching and listening to the story, prepare a question that starts with ‘Who’. For example, ‘Who decided to leave home without talking to the family?’
- If you rolled a 3: While watching and listening to the story, prepare a question that starts with ‘Why’. For example, ‘Why was the family unable to stay in their home?’
- If you rolled a 4: While watching and listening to the story, prepare a question that starts with ‘Where’. For example, ‘Where was the first place the family decided to search for a new home?’
- If you rolled a 5: While watching and listening to the story, prepare a question that starts with ‘What if’. For example, ‘What if the brother said he would not leave their home to move to a new home?’
- If you rolled a 6: While watching and listening to the story, prepare a question that starts with ‘How’. For example, ‘How did this story connect to your life in some way?’
- View the story.
- Jot down your question while watching and listening to the story. (If a player is not able to write, have him/her think of a question.)
- After watching and listening to the story, take turns asking each other questions! Replay parts of the story if and when necessary!
Learning with Shadows
Learn About: Science, Art, Writing
Materials: device with internet access; depending on activity – paper, sidewalk chalk, toys, flashlight
Shadows provide creative ways to learn about science and practice art. Check out some of these activity ideas for your student!
Facts About Shadows
- A shadow happens when an object blocks the sun’s (or other light source’s) rays.
- Shadows are longer in the winter because of the angle of the sun.
- Your shadow is longest in the early morning and late afternoon. This is because the sun is lowest that that point in the day and the rays shine on the side of the object.
- Your shadow is shortest when the sun is directly above the object.
- Shadows appear larger if they are closer to the light source.
Learning Activities
Make a Shadow Journal
- Create a journal that shows the length and position of the sun at different times of the day. (REMEMBER: DO NOT LOOK DIRECTLY AT THE SUN!)
- Go outside on a sunny day or find a flashlight or bright light. Make shadow puppets from paper or with your hands to tell a story. You can make up your own story or tell one of your favorites. You could even use shadow puppets while you read your favorite story. This tutorial by Simple Most shows you different shadow puppets you can make with your hands. If you prefer, you can make your shadow puppets out of paper. You can find directions on Planet Science's website.
Make a Shadow Drawing
- Use small objects to draw pictures (plastic animals or small stuffed toys work well). Set them up in the sun and place a piece of paper in front of them so that the shadow is visible on the paper. Draw the objects you see. This activity is best done in the early morning or late afternoon when shadows are longest.
- Use the drawings to write a story or a poem to share with your family and friends. You can make an online storybook to share using free online publishing tools.
- Trace shadows of yourself or other objects on the sidewalk or driveway with sidewalk chalk. You could make shadows of different dance moves or tell a story with your shadow drawings. Color them in with the chalk for even more story fun.
- If you don't have sidewalk chalk, take pictures of your shadow while you move around to create a story in pictures. The below resources can help you create a video story online.
- Animoto
- iMovie (iPhone or iPad only)
- Shadow Puppet EDU (iPhone or iPad only)
The Science Behind Shadows and Sundials
Shadows form when light cannot pass through an object. Light is a form of energy. It travels in straight lines, call rays. When the rays strike an object that they cannot travel through, there is an area of darkness on the other side of the object. This dark area is called a shadow.
- Opaque – Opaque objects block light. (Examples would be a piece of wood, a metal pan or you.) Opaque objects are the ones that have shadows. Can you find objects around your house that are transparent?
- Transparent – When light shines through something it is said to be transparent. (A clear glass or a windowpane are transparent.) Can you find examples of transparent objects around your home?
- Translucent – Translucent things block part of the light. Sometimes translucent objects only let certain colors of light pass through. (A colored glass or even some lollipops are translucent.) What can you find around your home that is translucent?
- Reflective – Reflective objects direct the light rays back toward the light. (A mirror is reflective. That is why you can see yourself.) Can you find other reflective items in your home?
Sundials
A sundial has a pole, called a gnomon, in the center. When the sun shines on the gnomon, it casts a shadow. As the Earth rotates on its axis, the sun appears to move across the sky (the sun isn't actually moving - the earth is). So, as the Earth rotates, the shadow of the gnomon on the face of the sundial changes. The Earth rotates on its axis at a speed of 460 meters per second (about 1000 miles per hour). As a result of the Earth’s movement, the shadow of the gnomon moves approximately 15 degrees. So, over a 24-hour period (1 day) the Earth travels a full 360 degrees (or a full circle).
Learn More
Scientific American has a lot of great science activities. All of these provide information about a science concept and a related activity. You can read the article about sundials at Scientific American's website.
This lesson was created by Abbey Buessing. Abbey is a senior at WU studying elementary education.
Egg Carton Flowers
Learn About: art
Materials: egg carton (not foam), paint, paint brush, paper straw or pipe cleaners, scissors, glue, pom-poms
This art activity is sure to brighten up your home and give you and your child the perfect opportunity to talk about spring and what happens during springtime!
Directions
- First, as the adult, cut a square of four containers out of the egg carton and trim around the edges so that it gives the sides a rounder shape for the petals of the flower.
- Squirt paint onto a paper plate so the children can paint flowers.
- After the paint has dried, attach the stem (paper straw or pipe cleaner) by gluing it to the back.
- Choose a colored pom-pom and glue it to the center of the painted egg carton.
ABC House Hunt
Learn About: literacy
Materials: none needed, paper and pen optional
Gather all learners and go through your home to find items that begin with each letter of the alphabet!
To practice spelling or drawing, learners could write or draw what they find for each letter. For example, for the letter “a”, learners could write (or draw) apple, appliance, allspice, afghan . . .
Cooking Up A Learning Activity
Learn About: math, literacy
Materials: device with internet access, other materials vary by recipe
A daily at-home activity is meal preparation. Breakfast, lunch and supper are woven into our day, so why not make it a learning experience? Following are two links that offer a number of delicious recipes that provide the perfect opportunity for you to help your learners read and follow directions, as well as hone those math skills!
Spring Break kid recipes by Taste of Home
Kids Cooking Recipes by Delish
Challenge . . . work with your learners to double the recipe and discuss the importance of math and measuring! Food is not only fun to eat, but fun to make!
Example Recipe by Taste of Home: Peanut Butter and Jelly French Toast
Ingredients
- 3/4 cup peanut butter
- 12 slices bread
- 6 tablespoons jelly or jam
- 3 large eggs
- 3/4 cup 2% milk
- 1/4 teaspoon salt
- 2 tablespoons butter
Directions
- Spread peanut butter on 6 slices of bread; spread jelly on 6 slices of bread.
- Put 1 slice of each together to form sandwiches.
- In a large bowl, whisk the eggs, milk and salt.
- Dip both sides of sandwiches in egg mixture.
- In a large skillet, melt butter over medium heat.
- Cook sandwiches for 2-3 minutes on each side or until golden brown.
This activity plan was made by Abbey Buessing, a future educator and Washburn University student in the preschool practicum class taught by Dr. Judith McConnell-Farmer.
Amazing Bubble Art
Learn About: art
Materials
- bubble solution and wands
- white paper
- small plastic cups
- food coloring
This art activity is sure to brighten up the day and give you and your child the perfect opportunity to talk about bubbles and how they work!
Directions
- First, pour a small amount of bubble solution in each bowl and add approximately five drops of food coloring to each bowl, making each bowl of bubbles a different color (stir it up well)
- Next, lay your paper on the grass or sidewalk and dip your wand into the colored bubbles and blow onto your white paper. When the bubbles pop, they’ll leave colorful imprints on the paper.
- Finally, let dry and display
Three Clues
Learn About: reading, writing, observation skills
Materials: note cards (or any paper) and pencils/pens
Homes are filled with so many items! One room that is often packed with all sorts of ‘goodies’ is the kitchen. This literacy activity is not only fun, but stretches students’ reading and writing skills! .
Directions:
- Each player is to use a notecard to provide three clues to describe a kitchen item.
- Once everyone has completed his/her notecard, players exchange cards, read the provided clues, and guess the described item. (Early learners may ‘draw’ a kitchen item instead of writing clues.)
Example:
- My kitchen item has numbers on it.
- My kitchen item also has a door.
- My kitchen item uses electricity to work.
This literacy activity was created by Abbey Buessing. Currently, Abbey is a senior at Washburn University studying elementary education. She will Student Teaching during fall 2020.
Story Slam
Learn About: literacy, storytelling
Materials: Paper, markers (or pencils, pens)
Directions:
- First, gather each person who wants to participate. (Have enough paper and markers for each player.)
- Next, assign each person a different Story Element from the following options:
- Setting
- Character/s
- Plot
- Problem/Conflict
- Resolution
- Finally, after everyone has written down their story element and has had time to think, start piecing the story together!
Extension Idea: Have children practice writing the story in a booklet, creating illustrations for the story, or create new stories! As a group, you could even take time to discuss the story’s point of view.
This lesson was created by Heidi Jo Hayen. Currently, Heidi Jo is a senior at Washburn University studying Elementary Education. She will Student Teach during fall of 2020!
Morning Show at Home
Learn About: speaking skills, topic of choosing, research
Materials:
- Video camera (one on your phone is perfect)
- Access to view a morning show
- Internet access
- Props to make a “set” if you would like (not necessary, but fun!)
The focus of this activity is to grow students’ speaking skills, which are a crucial part of English language arts education. The goal is for students to use: appropriate volume, enunciation and rate when recounting a story, experience or topic.
Directions
- Watch a morning show, such as the Today Show or Good Morning America with your children. This provides them with an example of what they will be doing.
- Pose your children with the question, “If you got to be on a show like this, what would you want to talk about?”
- Provide your children with some topics such as pop culture, food, health and wellness, style/fashion, things to do at home to think about. Research the latest trends regarding those topics with your children. Some examples of “segments” they can create for their morning shows are:
- How to make the perfect smoothie
- Exercises you can do inside on a rainy day
- A review of a new book/movie/album
- How to organize your toys
- Then, have your children plan and write a “script” for their “segment” on their very own morning show.
- Your children can create one “segment” or many “segments” for their morning show.
- If you have multiple children, they can create “segments” together or independently.
- Once your children are prepared, you can film their “segment” for the morning show.
- Parents can emphasize that students use appropriate volume, enunciation, rate when filming their “segment”.
A fun way to enhance the filming is to have your children create a set for their morning shows.
Watch your children’s morning show together as a family and learn about new topics!
Instead of trying to get your child off the computer, let them learn while playing computer games! Prodigy is a semi-RPG learning game that will take your child on a quest to fight monsters while using math as magic spells. The game is free, but does have some in-game purchases that require parental permission.
Early Childhood
Jello Play Dough
Learn about: Science
Materials:
- 1 1/3 cup of flour
- 1 cup of boiling water
- 1/2 cup of salt
- 1 tablespoon of oil
- 2 tablespoons of cream of tartar
- 1 package of Jell-O (sugar-free)
A great way to involve your preschooler (or older student) in science is to have them help make Jell-O Play Dough. For even more fun, make multiple colors using different flavors of Jell-O.
Directions: Add all dry ingredients to a small bowl. In a large measuring cup, dissolve Jell-O with cup of boiling water. Mix in 1 tbsp. of oil to the liquid mixture. Mix dry and liquid mixture together. Turn mixture out on wax paper or plastic wrap sprinkled with a little flour. Knead.
In addition to playing with the play dough, you can use it to teach your child about letters and words:
- Roll the play dough out like a tablet and use toothpicks to draw and make letters.
- Roll out long ropes of play dough and make letters. Say the names and sounds for the letters. (See attached sheet on sound phonemes.)
- Draw or make letters for words that you know, i.e. family names, basic words, etc. Make cards for basic words and put in a plastic protector to make the word on the example.
Sorting and Patterning
Learn About: thinking skills, logical thinking, recognizing patterns
One of the best activities you can do with your preschooler around the home is sort and look at patterns. You just need to find some items that can be sorted, i.e. buttons, pom-poms, paper clips, etc. It is best if the items are all different in sizes and shapes and colors, then you can separate them by all those attributes.
Materials
- a number of the same item, such as pom-poms, paper clips, buttons, etc.
Directions
- Find your group of items to sort.
- Give your preschooler a muffin tin or cups in order to sort the items. Let them sort however they want, then ask them “how” they decided to sort them.
- Next, have them sort by specific attributes: size, color, shape, etc.
- After your child has sorted the items, then have them create a pattern.
Use the items and lay them out in a row where they repeat certain pattern. Start simple, then do more complex patterns.
Why is sorting and patterning important?
Sorting activities help children develop a range of thinking skills and build the foundations for later problem solving. Recognizing similarities and differences are important in problem solving. Patterning allows preschoolers to make predictions, to understand what comes next, and to make logical connections, and to use reasoning skills. Both of these skills will help your preschooler in reading and mathematics in the future. Hint: If you always have your preschooler work from left to right (dump the pile of items in a plate on the left side of their work area), this is also training their eyes which will be reading words from left to right!
Measurement
Learn About: measuring, math, estimating
Materials: measuring tools, such as a ruler, yardstick and/or tape measure; items to measure (preferably more than one)
Measurement activities are fun for preschoolers to do, and they also teach great lessons about the world around us, help figure out proportions and problem solve space issues.
There are lots of way to measure things, but this lesson is specifically for linear measurement. Rather than starting the measurement tools mentioned above, you can start with some non-standard measurement tools:
- A string
- A shoe
- A box
- A book
- Hand
- Foot
Example: “My desk was 6 shoes in length and 3 cereal boxes in length.”
Once, you’ve mastered non-standard measuring tools, you can bring out the real tools -- tape measure, meter stick, etc. Although you don’t need to stress accuracy at this point with a preschooler, you can show them how to measure by placing your finger as a mark to replace the tool.
This is a good time to talk about length, width, and height.
Expand your preschooler’s problem solving skills by talking about whether certain objects will “fit” in a certain space; then, measure to find out.
Even though estimating is another activity topic in itself, you can talk about “how many” measures a certain object is.
This activity was created by Abbey Buessing. Currently, Abbey is a senior at WU studying elementary education. She will student teach during fall 2020.
Bottle Bottom Turtles
Learn About: art
Materials: different colored paper, scissors, marker, two-liter bottle, hot glue
This art activity is a fun and cute learning opportunity. If you wanted to, you could even read a story about turtles and their lifestyle and habit. A great resource is National Geographic Kids: Sea Turtles.
Directions
- As the adult, trace a turtle shape onto a piece of colored paper. (If you don’t have colored paper, the child could color or paint a white sheet of paper.)
- Then, allow your child to cut out the turtle shape, with supervision, and draw a face on it.
- As the adult, cut off the bottom of a two-liter bottle.
- As the adult, hot glue the bottom of the bottle on your turtle shape.
Plastic Egg Towers
Learn About: math, STEM
Materials:
- Plastic Eggs
- Play-doh
- Tape measure/yard stick
- Camera (optional)
Building towers and structures helps children learn math and science concepts through play. Blocks are the usual material used to do this but it can be done using a variety of different materials. In this activity, plastic Easter eggs are used to think about building in a different way.
Directions
- Set out all the materials on a table or flat surface.
- Ask the child how they could use the materials provided to build a tower. If they aren’t sure, show them how to connect them.
- Challenge them to build the tallest tower they can. Create different challenges for them to try. Some examples are: tallest tower with 1 egg base, create 3 dimensional shapes/figures, or tallest tower with a limited number of eggs.
- Measure the tower/structure built to see how tall it is!
For older children: You can create a chart of how tall your tower/structures are based on the challenge provided. You can also take a picture to put with the chart.- An example chart:
Build the tallest tower you can using only 10 eggs Tower Height (inches) 1 10 in 2 13 in 3 8 in
- An example chart:
- Create a fun competition with a sibling or your family to see who can build the tallest tower!
Alphabet Tiles
Learn About: reading
Materials
- Paper (printer, cardstock, poster board, etc)
- Writing utensil
Activities which encourage alphabetic principles in your preschooler are important precursors to reading. A fun activity for your child that can be done easily with what you have in your home is "Alphabet Tiles."
Directions
- Cut any kind of paper into large squares.
- Write or draw a letter of the alphabet in the middle of each square.
- Pick a letter and have your child find the letter or words beginning with this letter in magazines, newspaper, or junk mail throughout your house. Even small objects could be attached to the tile.
- Encourage your child to find pictures in the magazines which begin with that letter or draw their own pictures.
- Talk to your child about the “name” of the letter, but also provide the “sound” of the letter. When you get to the vowels…you might want to do a tile for the “long sound” of the letter and the “short sound” of the letter.
- Try to do several letters and vowels first so you can make some small words from the tiles, like “cat”, “mat”, “sat”, etc.
- Once you have several tiles, you could connect the tiles together by punching holes in the corners then attaching them with small pieces of yarn or twist ties. Don’t worry about putting the letters into sequence. Preschoolers should be able to name and sound out the letters out of order. (Not just the normal ABC sing song that we hear at this age!)
Subitizing
Learn About: math
Materials: dice or dominos
One of the best ways you can help your preschooler with mathematical concepts is to get out the dice and dominoes! By having these things in your toolbox for preschoolers, you can help your child with the math skill call subitizing!
What is subitizing?
Subitizing is the ability to immediately recognize “how many” is in a small group without counting each object in the group. The best way to teach this skill is with dice or dominoes.
Why is subitizing important?
Educators have known for some time that when children can recognize numbers in patters they have a stronger number sense overall.
Directions
- Using the dice or dominoes start with having your child recognize small numbers (1, 2 or 3) by just looking at them.
- Have them draw what this looks like on notecards and practice until they “have it!” This is perceptual subitizing…instantly recognizing how many there are in the group.
- After they have this skill where it is instantaneous, then, work on conceptual subitizing where they recognize small groups and adding these together. For example, there are two dots on each side of the domino and they add them together to make four. It is always good to start with doubles such as 2+2, 3+3, etc.
Impress your friends, when you tell them your preschooler is subitizing!
This activity plan was created by Abbey Buessing, a student at Washburn University and future educator enrolled in ED 369: Student Teaching in Preschool Practicum taught by Dr. Judith McConnell-Farmer.
Alphabet Spaceship Craft
Learn About: alphabet, reading, art
Materials: construction paper in a variety of colors, star stickers, glue, scissors, marker
This activity will teach young learners about the alphabet, as well as work on their fine motor skills. You and your child can use the letters in their name to "build" a spaceship - with the letters as the body of the ship!
Directions
- Pull out a sheet of black or blue construction paper. You or your child will cut out all the shapes: a triangle, squares (one for each letter of their name), and rectangles (three of them)
- Have your child write the letters of their names on the squares and then have them glue the squares down in order down the center of the page
- Have your child glue down the triangle on the top of the letters and the rectangles, as flame, at the bottom of their name
- Add the star stickers around the paper for it to look like space
Counting by Ones on a Giant Number Line
Learn About: counting, math
Materials: chalk, dice, outdoor space with concrete
This will be a fun way for children to practice counting by ones (from 1-20) and get them moving around outside!
Directions
- Gather your materials and find your space.
- Draw a long line on the concrete.
- Put 20 ticks on the line and number each tick sequentially beginning with one.
- Have the child stand at the beginning of the number line at number one.
- The child will roll a six-sided die and jump the number of ticks they rolled (counting begins after the number they are standing on. So, if they are standing on six and roll a three, they should end up on nine). Ask them to count aloud.
- Continue letting the child roll the die and jump between spaces until he or she reaches twenty.
- Once the child reaches the end of the line, instruct them to do 20 jumping jacks (or other activity) while counting aloud.
- Repeat the activity if desired.
Finger Painting Fun
Learn About: art
Materials
- one cup cornstarch (substitute: 1/2 cup cornstarch and 1/2 cup flour)
- three cups water
- one tablespoon fine salt
- food coloring
Gather your family to make finger paint with only three ingredients! We don't recommend eating this paint, but all ingredients are non-toxic. Little learners can use this paint to practice writing their name, draw a self-portrait or draw anything they can think of!
Directions
- Combine dry ingredients in a saucepan.
- Add 2 cups of cold water and stir until completely dissolved. The mixture will be thin and milky.
- Heat the mixture over medium heat, stirring constantly. After a few minutes, it will start to thicken and become lumpy and change from milky to translucent. Just keep stirring until it is smooth and translucent.
- Remove from heat and stir in 1/2 cup cold water.
- Divide the gel into smaller bowls or wide-mouth cups. Add a couple drops of food coloring to each, stirring until well-blended.
- Stir in more cold water, a little at a time, until the homemade finger paint is creamy and easy to spread.
- Unleash your creativity and paint away!
First - Third Grade
Friendship Pie and Poem
Learn About: Literacy, Vocabulary, Poetry
Materials: Device with internet access, pencil, paper
This lesson was created by Madison King, a senior in elementary education at Washburn. It will build skills in vocabulary and poetry, as well as get children thinking about friendship.
To start, visit the Storyline Online website to listen to “Enemy Pie.”
Before listening to “Enemy Pie,” consider asking your child(ren) the following:
- Do you have a best friend?
- What special qualities make this person a friend?
- What is the opposite of a friend? Is it a stranger, is it an enemy, or is it something else?
After listening to “Enemy Pie,” consider asking your child(ren) these questions:
- Why didn't the main character like Jeremy Ross?
- Why did his father suggest enemy pie?
- So, did the pie work?
- What else might his Dad have suggested? Why was the pie a clever idea?
Talk with your child(ren) about what makes a good friend and create a list of traits or ideas. Some prompting phrases for this may include: "Friends are always ____,” "Friends always _____” and “My friends and I like to ____”
Click here to visit Wordle and allow the child(ren) enter the words or phrases from the list into a free-form poem.
Finish this lesson by having your child(ren) create a Friendship Pie Recipe using the traits included in their free-form poem.
Ingredients:
A dash of: __________________________________________________
A cup of: ___________________________________________________
A pinch of: __________________________________________________
A spoonful of: _______________________________________________
Performing with Readers' Theater Scripts
Learn About: Literacy, Acting, Art
Materials: device with internet access, working printer with paper
Improve students’ reading fluency with practice and performance through Reader’s Theater Scripts. These scripts are from more than 100 popular children's books that have been turned into plays.
Encourage creativity by acting the scripts out and creating set pieces or art to go along with the stories!
DIY Noisemakers and Hearing Devices
Learn About: science
Materials: listed under each activity
You can make and hear noise with many different things around your house. Try some of these ideas to make your own noisemakers, telephones, stethoscopes and more!
Make a Noise Maker
Materials
- a sheet of paper (newspaper is great but any paper will work)
Directions
Why This Works
All sound is made by something vibrating. Vibrations shake the air back and forth creating waves. The sound waves travel through the air and into your ear. In this case when you flick your wrist, air catches in the cone shape and the paper opens out into a new position causing vibrations. These vibrations make the loud popping that you hear.
Try using different sizes of paper or types of paper. How does this change the sound you hear?
Make a Stethoscope
A stethoscope is an instrument used by medical professionals to hear the heart and lungs of patients. Try making one out of paper.
Materials
- 2 pieces of paper
- cardboard tube (paper towel tubes work well)
- tape
- scissors
- balloon (optional)
Directions
- Cut 2 large circles from the paper (1 from each sheet).
- Decorate your circles and your tube if you wish.
- Cut a small hole (the size of the cardboard tube) in the center of each circle and cut out the circle.
- Cut one slit from the edge of the circle to the center.
- Form a cone shape from each of the circles.
- Tape one cone to each end of the tube (fitting them close as possible to the tube)
- If you have a balloon, cut it into a flat piece and tape it to one of the cones. (This is optional but will amplify the sound if you can do this part.)
- Your stethoscope is ready to use. Try listening for the heartbeat of people in your home.
Why This Works
The balloon (if you have it) amplifies the sound. Sound waves spread out and become harder to hear as they travel through the air. The cone closest to the heart collects the sound waves and pulls them together. The sound waves travel up the tube to the cone closest to the ear. The sound that you hear is the heart beating. Every time you hear a heart beat the heart (a powerful muscle) contracts and pushes blood into the body. This helps to deliver oxygen and nutrients (carried by the blood) to all parts of the body.
More Ideas
There are lots of ideas for making stethoscopes online. You can find three different designs on sciencebuddies.org.
Want to know more about the heart and the circulatory system? Check out Kids Health online.
Make a Straw Oboe
Do you know what an oboe is? It is a woodwind instrument that uses a double reed. A double reed is two small pieces of reed that around a tube. The oboe sound comes from a vibrating column of air inside the instrument. The two reeds vibrate together when air is forced across the reeds and into the tube. (Click here to hear an oboe and see an oboe player.)
Materials
- one plastic straw (flexible or straight will work)
- scissors
- paper and tape (optional)
Directions
- Flatten one end of the straw by biting down on it and pulling it across your teeth (do this a few times to be sure it is flat).
- Cut each side of the flattened end of the straw diagonally to form a point.
- Play your straw oboe by placing it between your lips and vibrating your lips against the straw. (Don’t bite down on the straw, just hold it between your lips. This will take some practice, but you can get it!)
- You can change the sound that you make by making a cone from paper and tape and attaching it to your straw oboe. (Try your oboe with and without the paper tube and with different sizes of tubes.)
Why This Works
When you blow into the straw, the edges of the straw vibrate and send pulses of compressed down the straw. The air in the tube (or the cone) will begin to vibrate as well. If the vibrations are strong enough you will hear a sound.
More specifically, when you blow through the straw you create high pressure in your mouth. As you blow through the straw, the pressure in the straw drops. The high pressure outside the straw (in your mouth) pushes the sides of the reed together and stops the flow of air. Eventually, the pressure inside the straw builds and opens the reeds again.
More Ideas
Want to know more of the science behind an oboe’s sound? Check out these sites online.
- Youtube video about the oboe
- Learn how woodwind instruments work
- Video about the science behind woodwind instruments and how they make sound
Make a Telephone
Materials
- two paper or plastic cups
- long piece of string
Directions
- Find two identical plastic or paper cups.
- Punch a small hole in the bottom of each cup with a sharp pencil
- Tie a knot in one end of the string
- Feed the other end of the string through the hole in each cup (with the open end of the cup facing out so that you can hold it up to your ear)
- Tie a knot in the free end of the string
- Decorate the cups if you wish
Have a partner talk into one cup while you listen and then switch. Can you hear what your partner is saying? Be sure the string is pulled tight and you in a straight line.
Why This Works
Sound waves (vibrations) travel along the string. The bottom of the cups works as microphones and speakers to pick up the sound vibrations on one end and reproduce them on the other.
More Ideas
Tie a fork, spoon or metal coat hangar in the middle of a piece of string (about two feet long). Hold each end of the string in one ear and ask your partner to strike the fork, spoon or hangar with another metal item. Do you hear the sound through the string? This works just like the sound traveling in your paper cup phone. (You can also do this with two things tied on one end of the string. Cover one ear and hold the string in the other ear. Move around to make the items on the string hit together.)
Sensory Poetry
Learn About: literacy, word fluency, poetry
Materials: device with internet access, any food item, paper and colored pencils/crayons/markers (optional)
Poetry is a great way for students to build fluency. We encourage you to explore the Poetry4Kids website with your children. Allow them to practice reading poems they choose in order to enhance reading with expression and reading as if they are talking. Reading poetry others have written allows students to hear synonyms for words they have heard before and expand their own vocabularies.
A sensory poem allows students to explore their own senses and express creativity. It uses words to describe what you see, touch, hear, smell, and taste.
How to Create a Sensory Poem
- Have your student choose a food item in the household.
- Ask your child the following sensory observations to develop some descriptions of their selected food item:
- I see _______________
- I feel _______________
- I smell ______________
- I taste ______________
- Transer the sentences to a computer or paper where they may draw a picture of the item and add colors that express the item (this part is optional).
Example Sensory Poem:
Crazy Captions
Learn About: creative thinking, writing, art
Materials:
- photos (family photos, magazine or newspaper clippings, photos from Google, etc)
- glue, scissors
- paper (construction paper, poster board, printer paper or a notebook all work)
- writing utensils (pen, pencil, markers, colored pencils, etc)
When writers include a picture in their story, they usually have a caption with it. The caption should clearly describe what’s happening in the picture. Writing captions can be a great way to improve writing skills, observation skills and creative thinking.
Directions:
- Find pictures to look at – family pictures, pictures clipped from magazines or newspapers, or pictures from the internet.
- Pick several pictures out and glue them onto paper or into a notebook.
- Think of captions that describe each photo and write them beneath each photo; these captions can be descriptive, funny or as crazy as you want!
- Assemble the pages into a booklet and present it to a family member. Talk about the captions and photos.
If your student is older:
- Pick out three photos and write a creative news story that ties the photos together, along with writing captions.
Make a Volcano
Learn About: science
Materials
- Play-doh
- Small disposable cup
- Paper plate
- Cup
- Scissors
- Baking soda
- Vinegar
- Red food coloring
Volcanoes are openings in Earth's surface that erupt hot lava. Have you ever wanted to create a volcano in your home? It is easy to do!
Learn about volcanoes before creating your own. Here are some resources:
- Volcano video: https://www.youtube.com/watch?v=lAmqsMQG3RM
- Volcano Facts: https://www.natgeokids.com/uk/discover/geography/physical-geography/volcano-facts/
- All About Volcanoes: How they form, Eruptions and More video: https://www.youtube.com/watch?v=K7Oq9_DU1Mc
- Volcanoes for Kids | A fun and engaging introduction to volcanoes for children video: https://www.youtube.com/watch?v=3Jxeh-yAXek
Directions
- Cut the bottom of the paper cup off about 2 inches from the bottom.
- Make a base out of Play-doh (use an amount about half the size of a baseball) and place it in the middle of the paper plate.. Place the bottom part of the cup that you cut off on top of the play-doh. Use Play-doh to build the sides of the volcano.
- Take the plate with your volcano outside and place it on the ground.
- Pour a little bit of baking soda into the cup that is built into the volcano. (start with a 1-2 tablespoons)
- Pour vinegar into a cup and add a few drops of red food coloring to make it look like lava.
- Predict what is going to happen when the vinegar is added to the baking soda.
- Pour the red vinegar into the top of the volcano and watch what happens! How does the volcano eruption you created at home differ from the real volcano eruptions that occur in nature?
Homophones Memory Game
Learn About: vocabulary, homophones
Materials: flashcards, scissors
Homophones are words that sound the same, but have different spellings and meanings. Play a memory matching game to help your student understand homophones.
Directions
- Create your flashcards.
- Shuffle the cards and place each card face down.
- Have one player pick up two cards. If the cards don't match, put them back in their places. If they do match, have the player define each word before collecting the cards.
- If they define the word(s) incorrectly, they can keep the cards but have a one point penalty for each incorrectly defined card.
- After all the cards are matched, have each player count their cards, and then subtract any penalty points. The player with the highest score wins.
Modifications
- If the players are more advanced, rather than having point penalties for incorrect definitions, have players replace the cards back in their original place. Players may only collect cards with correct definitions.
- Players can also play without point penalties or having to define the homophones.
List of Homophones
- cent and sent
- blue and blew
- ate and eight
- aloud and allowed
- deer and dear
- cell and sell
- bear and bare
- ant and aunt
- I and eye
- hair and hare
- great and grate
- flew and flu
- in and inn
- haul and hall
- grown and groan
- flower and flour
- oar and or
- meat and meet
- lead and led
- knew and new
- pale and pail
- one and won
- main and mane
- knot and not
- way and weigh
- tail and tale
- sail and sale
- rain and reign
- where and wear
- toe and tow
- sea and see
- read and red
- your and you're
Skip Counting Hopscotch
Learn About: multiplication
Materials: sidewalk chalk, outdoor space on concrete
This is a fun way to review skip counting and get kids ready to learn multiplication. It also gets kids outside and moving around!
All you need are a few pieces of chalk and an outdoor sidewalk space.
Directions
- Gather your chalk and find your space.
- Draw your hopscotch frame.
- Fill in the numbers for each square after you have decided what you want to count by (twos, fours, fives, etc.) . For example, if you want to count by twos, you would number squares only in multiples of two (2, 4, 6, 8, etc.).
- We recommend not putting the numbers in order so that the activity is a little more difficult.
- Now, the child(ren) can begin counting (out loud!) in multiples and hopping to the corresponding squares.
- Repeat the activity with other numbers if desired.
Flipping Pancake Fractions
Learn About: fractions
Materials: device with internet access
Click here to visit the Flipping Pancake Fractions game.
See fractions in action as you flip pancakes! Help the cook in a restaurant complete his orders by flipping over the number of pancakes on the order form (e.g.: flip 1/8 of the pancakes you see).
Fourth - Sixth Grade
Paper Airplane Experiments
Learn About: Science, Math, Physics
Materials: Device with internet access, paper (preferably of various sizes and materials)
Making paper airplanes in school can get you into trouble, but it can also lead to great physics experiments. Below are some ideas for using paper airplanes learn about science and math.
Fun Facts About Paper Airplanes
The largest paper plane had a wingspan of 18.21 meters (59.74 feet ). You can read more about it online here.- The world record for time for a paper airplane flight is 29.2 seconds. You can read more here.
- The longest flight for a paper airplane is 69.14 meters (226 feet and 10 inches). You can see a video of the flight here.
There are many great experiments that you can do with a paper airplane. These experiments involve variables. A variable is something that can be controlled or changed in an experiment. It is important in science experiments to only change one variable at a time. For example, if you change the type of paper you use for your airplane, you need to keep the design and size of the paper the same.
Try some of these experiments.
- Make your favorite paper airplane design and test it against other models. Remember to keep all of the other variables the same. Try flying all of your models and measure which one goes the farthest or time the flights and see which one stays in flight the longest. Try flying the airplanes so that they do stunts. Will one make more loops than the others?
- Choose the “best” paper airplane model and try making it out of different kinds of paper. Remember, keep all other variables constant. Test these and record your findings.
- Make one mode airplane out of different sizes of paper. Does the size of the paper make a difference?
- Pick one paper airplane, and try using different technique to fly it. Does it make a difference if you fly it overhanded or use a side arm motion? What if you stand on a chair and throw the plane or stay on the floor?
- What other experiments can you think of to try with paper airplanes?
The Science Behind Paper Airplanes
There are four main forces that help the plane stay in the air.
- Thrust – Thrust is a push. When you throw the plane you are exerting thrust on the plane.
- Lift – Lift is an upward acting force that holds the plane in the air.
- Gravity – Gravity is the force that pulls the plane down.
- Drag – This is the opposite of thrust. This slows the plane down.
Create Your Own National Park
Learn About: Social Studies, Science, Literacy
Materials:
- Device with internet access
- Paper and pencil/pen
- Colored pencils/markers/crayons and paper (creative option #1)
- Shoe box/cardboard box, various crafting supplies, or materials from outside such as grass, rocks, etc. (creative option #2)
This lesson was created by Heidi Jo Hayen, a senior at Washburn studying Elementary Education.
Beginning in 4th grade, your student started learning about the various regions throughout the U.S. Those regions are: West, Midwest, Southwest, Southeast, and Northeast. Students have learned about the geography of each region, which includes elements like location, landforms/bodies of water, natural resources, climate, and aspects of the ecosystems located there such as plant life and wildlife.
Creative Portion
Option #1
Using his or her knowledge from what he or she already learned at school or what they decided to research at home, have your student draw a map for a new national park. Encourage your student to make geographical elements of the national park realistic for the region of the U.S. in which they decide it is located. Remind your student to create a Map Key and a Compass Rose for his or her map.
Option #2
This is similar to Option #1 in that your student will create his or her own national park. However, instead of creating a map, your student can create a 3D model of their national park. They can use cardboard as the foundation and can use crafting materials or collect objects from outside to build the various geographical elements of their national park.
Writing Portion
Encourage your student to write about their new national park. There are four main types of writing: narrative, informative, opinion/argumentative, and technical. Listed below are some examples of what your student can write that fall under each category.
- Narrative
- Write a story from the perspective of someone working at the national park.
- Write a series of tweets as someone who is visiting the national park that describe the unique geographical elements of the park.
- Informative
- Create a pamphlet explaining the different geographical elements of the national park.
- Write an article for National Geographic covering the new national park.
- Opinion/Argumentative
- Write to his or her state representatives/senators as to why the state should protect/preserve the national park.
- Create a list of reasons why people should visit their national park.
- Technical
- Write a job manual for the park rangers working in the national park.
- Create a survey for park visitors to take when they leave the national park.
This activity was created by Miss Heidi Jo Hayen. Heidi Jo is a senior at Washburn studying elementary education. She will student teach this coming fall.
Create a Nature Journal
Learn About: literacy, writing and science
Materials:
- Device with internet access
- Journal, notebook, or any paper you can bind together
- Pen or pencil and coloring materials
This activity practices informational writing. At the completion of their nature journals, students will have conducted research and observations that enabled them to write informative pieces on species native to where they live.
Directions
- Research
- Using the internet, research plant and animal species that are native/indigenous to area where you live.
- Choose some of those species that you’re fairly certain you will be able to locate near where you live.
- At the beginning of your nature journal, record what you’ve learned about each of the species… this can include drawings too!
- Create Observation Chart in Your Journal
- In your nature journal, create a chart for observing your species in nature.
- Create five columns for your chart:
- Species
- Time/Date
- Location
- Weather Conditions
- Observation (You can make this column wider than the others.)
- Leave room on your nature journal page for any notes you might want to add.
- Plan Your Observations
- Choose spots where you can go to observe your species.
- Plan an observation schedule: Maybe you go at the same time every day for a week. Maybe you go on the same day every week for three weeks straight. How often you observe and the conditions upon which you observe are up to you!
- Complete Your Observations
- It’s time to bring your nature journal with you to the spots you’ve chosen and fill out your observation chart.
- Record as much detail as possible. Write notes about the important details you observed.
- Compile Your Notes
- Read back through your notes from your observations. Look for trends/patterns that you observed.
- After reading through your notes, dedicate a page in your nature journal for each of your species. You don’t have to fill the page, just include how your species behaved and adapted to its surroundings. You can draw more pictures of your species here if you’d like!
Questions, Questions
Learn About: problem-solving, communication, observation, STEM
Materials: None
Ask questions to identify mystery objects! Similar to "I Spy," this game will focus on attention to detail and observation.
Directions:
- Choose any article from your nearby surroundings (such as a comb, a chair, a picture on the wall, a glass with some liquid in it). The idea is to choose something that is one of many so that you must focus on the specific details to distinguish between similar objects.
- Tell the other players that you are thinking of an object. You can decide if it is important to give a hint or not.
- The players ask questions in order to figure out the mystery object. Only yes/no questions are allowed.
- The first person to figure out the object wins this round and gets to pick the next object.
Why is this a STEM activity?
Three of the process skills that are vital for science learning are observation, questioning, and communication. Scientists need to be able to observe and ask good questions in order to learn more about the world around them. These activities encourage good questioning and observation skills.
Asking and answering questions is what scientists do! In order to answer questions, scientists will think about all the information they have and often ask more questions. By solving riddles, you are answering questions by thinking through the information you have and asking yourself other questions as you solve the riddle. Can you make up a riddle?
As scientists learn more about our world, it is very important for them to share what they have learned. Communication is how information is shared. Scientists share what they learn in order to allow for even more learning to occur. Being able to communicate clearly and specifically helps to increase what we know.
Engineers solve problems. The problems presented here require that the person solving them try several different solutions to find the best answer to the problem. While not all answers are the best solution, these answers are not wrong, they are ways to add more knowledge and to move toward a better answer.
"Follow the Path" Communication Challenge
Learn About: communication, STEM
Materials: Two different colored pencils or pens, paper, a blindfold (optional)
Give your partner directions to follow a path you have designed.
Directions:
- Have your partner put on the blindfold or cover his or her eyes.
- Draw a path on your paper using one of the colored pencils or pens. Don’t lift your pencil or pen until the path is complete. You want it to be one line with no breaks in it. The path can go in any direction and be as easy or as complicated that you want. You can fill up the whole sheet or make a small path in one corner of the paper. Put an arrow at the start of your path and an X at the end.
- Give your partner (still blindfolded or eyes closed) the other colored pencil or pen. Guide their hand to put the point of the pencil or pen on the beginning of the path you drew.
- The goal is for your partner to draw the exact same path you did. You can only give verbal directions (talk only – do not touch your partner or the pencil/pen).
- Let your partner take off the blindfold and see how closely they were able to follow your path with just your verbal communication.
- Switch roles and let your partner draw the path.
Why is this a STEM activity?
Three of the process skills that are vital for science learning are observation, questioning, and communication. Scientists need to be able to observe and ask good questions in order to learn more about the world around them. These activities encourage good questioning and observation skills.
Asking and answering questions is what scientists do! In order to answer questions, scientists will think about all the information they have and often ask more questions. By solving riddles, you are answering questions by thinking through the information you have and asking yourself other questions as you solve the riddle. Can you make up a riddle?
As scientists learn more about our world, it is very important for them to share what they have learned. Communication is how information is shared. Scientists share what they learn in order to allow for even more learning to occur. Being able to communicate clearly and specifically helps to increase what we know.
Engineers solve problems. The problems presented here require that the person solving them try several different solutions to find the best answer to the problem. While not all answers are the best solution, these answers are not wrong, they are ways to add more knowledge and to move toward a better answer.
Name It!
Learn About: communication, creative thinking, STEM
Materials: Paper, pencil
Give common objects new names! Be creative and think about what they are used for and their appearance.
Directions:
- Choose an area either outdoors or inside
- Set a time limit (10 minutes or less) and a certain number of items. (You might also want to determine a category such living, non-living, plant, appliance…)
- Each person must select the set number of items during the time limit and make up new names for the objects based on appearance, function, needs, location. (No real names are allowed.)
- When time is up, everyone shares their new list of names. Others try to determine which item is named.
- Optional: Put the made-up names on slips of paper. Play a game in which each player draws a slip and has to identify the item named on the slip.
Why is this a STEM activity?
Three of the process skills that are vital for science learning are observation, questioning, and communication. Scientists need to be able to observe and ask good questions in order to learn more about the world around them. These activities encourage good questioning and observation skills.
Asking and answering questions is what scientists do! In order to answer questions, scientists will think about all the information they have and often ask more questions. By solving riddles, you are answering questions by thinking through the information you have and asking yourself other questions as you solve the riddle. Can you make up a riddle?
As scientists learn more about our world, it is very important for them to share what they have learned. Communication is how information is shared. Scientists share what they learn in order to allow for even more learning to occur. Being able to communicate clearly and specifically helps to increase what we know.
Engineers solve problems. The problems presented here require that the person solving them try several different solutions to find the best answer to the problem. While not all answers are the best solution, these answers are not wrong, they are ways to add more knowledge and to move toward a better answer.
Solve riddles and problems! Click here for a PDF document of riddles and problems. Solutions are at the end of the document.
Why are these STEM activities?
Three of the process skills that are vital for science learning are observation, questioning, and communication. Scientists need to be able to observe and ask good questions in order to learn more about the world around them. These activities encourage good questioning and observation skills.
Asking and answering questions is what scientists do! In order to answer questions, scientists will think about all the information they have and often ask more questions. By solving riddles, you are answering questions by thinking through the information you have and asking yourself other questions as you solve the riddle. Can you make up a riddle?
As scientists learn more about our world, it is very important for them to share what they have learned. Communication is how information is shared. Scientists share what they learn in order to allow for even more learning to occur. Being able to communicate clearly and specifically helps to increase what we know.
Engineers solve problems. The problems presented here require that the person solving them try several different solutions to find the best answer to the problem. While not all answers are the best solution, these answers are not wrong, they are ways to add more knowledge and to move toward a better answer.
Paper Roller Coasters
Learn About: science, math
Materials
- Paper
- Tape
- Scissors
- Ruler
- Straws/markers/pencils/etc. for supports
- Pencil
- Sturdy surface as a base
- Marble
- Stop watch
Have you ever ridden a roller coaster? Some people find them exciting while others find them to be scary. Have you ever wanted to create your own? You can become a roller coaster engineer at home with just a few materials!
Here are some resources to learn more about rollercoasters before creating your own.
- Roller Coaster by Marla Frazze: https://www.youtube.com/watch?v=Sx_bMMZpksE
- Cool Facts About Roller Coasters - Nat Geo Kids video: https://www.youtube.com/watch?v=Wkp0-iGtfyI
- Why Roller Coasters are Awesome! - Science behind roller coasters video: https://www.youtube.com/watch?v=VcRFh-dCxWE
- What is Kinetic and Potential Energy?: https://www.youtube.com/watch?v=Ehx1P4adv6I
- Law of Conservation of Energy (Roller Coaster Demo):
https://www.youtube.com/watch?v=LrRdKmjhOgw
Directions:
- Before building your roller coaster, draw up an idea of what you want it to look like.
- Watch this for video instructions on how to build a rollercoaster: https://www.sciencebuddies.org/stem-activities/paper-roller-coaster#instructions
- Measure strips of paper out so they are all the same size. Make sure that they are wide enough to be able to fold side up to keep the marble on the track. These pieces are going to be the track.
- Begin building the roller coaster by taping the pieces of paper track together based on the design you drew. Making cuts along the sides of the straight track pieces will help bend them to make curves and loops.
- Do test runs while building your rollercoaster to make sure that the marble is able to go through the track. If the marble gets stuck, make adjustments to your track and/or design.
- Once the marble makes it through the entire track, do some trial runs to find out how long it takes from start to finish. Then find the average time it takes by adding the trial runs and dividing by the number of trial runs.
- An example table (all times made up)
Time Trial 1 8.6 seconds Time Trial 2 8.0 seconds Time Trial 3 9.3 seconds
8.6+8+9.3=25.9 25.9/3=8.633
Average time= 8.633 seconds - Can you find where your coaster is using kinetic and potential energy?
Making Oobleck
Learn About: science
Materials
- 1 1/2 cups of cornstarch
- 1 cup of water
- Big bowl
- Spoon
Objects are either a solid, liquid, or gas, but can something be more than one of these states of matter? In this activity you can explore a mixture that takes on more than one state of matter! A mixture that takes on more than one state of matter is called a non-Newtonian fluid. Enjoy exploring this mind-boggling mixture!
Before creating oobleck, you might be interested in reading the story Bartholomew and the Oobleck by Dr. Seuss. Oobleck gets its name from here. https://www.youtube.com/watch?v=rdIeeeDVgcs
Here is a video talking about the science behind oobleck and how to make it. https://www.youtube.com/watch?v=Fnd-2jetT1w
**NOTE** Do NOT put oobleck mixture down the drain when disposing of it. It can clog the pipes. Throw it away.
Directions
- Create your oobleck and allow the child to experiment with it. Ask questions like: What happens when you try to pick it up?, What happens when you hit it?, Can you roll it into a ball? What happens when you put a small item like a coin or a washer on the oobleck?
- Discuss if they think that the mixture is a solid or a liquid. Why do they think that? When does it take on the characteristics of a solid? When does it take on the characteristics of a liquid?
- Watch the video about the science behind oobleck linked above to learn about non-Newtonian fluids.
- Enjoy playing with the Oobleck and exploring how it acts!
This activity was created by Madison King. Currently, Madison is a senior at Washburn University studying Elementary Education. She will student teach during the fall of 2020.
Matching Synonyms and Antonyms
Learn About: language, synonyms and antonyms
Materials: Easter eggs, permanent marker
This activity will give students practice with matching words that are synonyms and antonyms. Understanding synonyms and antonyms helps students to expand their personal vocabulary and improve writing skills. Synonyms are words with the same meaning, while antonyms are words with opposite meanings.
Directions
- Gather plastic Easter eggs to be written on using permanent marker.
- Using the chart below, select pairs of synonyms or antonyms to be written on the top and bottom half of the egg.
- Using a permanent marker, or a piece of tape and permanent marker, write, or have a parent assist with writing synonym or antonym words that create a “pair” on the top and bottom half of the egg. For example, if you want to include the words wet and dry as antonyms, write the word “wet” on the top half of the egg and “dry” on the bottom half of the egg.
- Once you have the synonyms or antonyms written on the eggs, the eggs should be broken apart and mixed around on a flat surface, such as a table.
- Select an “egg half” at random and match the word to the correct synonym or antonym.
- Snap the top and bottom of the matching synonym or antonym together, resulting in the egg being in its original form.
- If you completed this activity initially with synonyms, repeat it with antonyms, or vice versa.
Synonyms
| Begin | Start |
| Big | Large |
| Fast | Quick |
| Fear | Fright |
| Good | Excellence |
| Old | Aged |
| Quiet | Peaceful |
| Right | Correct |
| Strange | Odd |
| Present | Gift |
| Sad | Unhappy |
| Occur | Happen |
Antonyms
| Large | Small |
| Long | Short |
| Healthy | Sick |
| Fast | Slow |
| Heavy | Light |
| Dark | Bright |
| Awake | Asleep |
| Careful | Careless |
| Create | Destroy |
| Cheerful | Sad |
| Gentle | Rough |
| Near | Far |
Thumbs are an important part of the body for many reasons. Learn about some of them below!
Thumbprints
Learn About: science
Materials: white paper, pencil, clear tape
Did You Know?
There is a 1 in 64 billion chance that two people will have matching thumb (or finger) prints. That means that there is an 11% chance that two people in the entire world have identical fingerprints. Not even identical twins have the same fingerprints. They will have similar patterns, but they will not be identical.
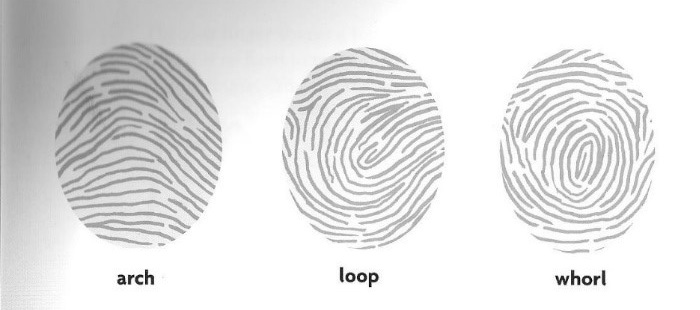
There are three basic fingerprint patterns. These patterns are known as arch, loop, and whorl. Fingerprints can have combinations of these patterns known as composites.
Compare the thumbprints of the people you live with. (Or ask some friends or relatives to send you pictures of their fingerprints.) Are any two the same? Do you see common patterns in the prints of family members?
You can see your fingerprints by looking at your fingers under a bright light, use a magnifying glass if you have one. Or, you can be a detective and take a thumbprint by following the directions below.
Directions
- Using a pencil, make a black smudge on a piece of paper. (The darker the smudge, the better the print.)
- Rub the tip of your thumb over the patch until it is black.
- Stick a piece of clear tape over the tip of your thumb. Press the tape down to be sure it sticks to your thumb.
- Lift the tape off your thumb and stick it to a piece of white paper. You now have a thumbprint that you can compare to others.
No Thumbs Race
Learn About: science
Materials
- Tape or a piece of string
- Any small items such as those listed below:
- A piece of paper or cloth
- A piece of clothing with a zipper
- A piece of clothing with a button and buttonhole
- A paperclip
- A pencil or pen and a piece of paper
Did You Know?
Human thumbs are called opposable because they can be moved around to touch the other fingers. This gives humans the ability to grasp things. Most primates (chimpanzees, gorillas, orangutans, for example) have opposable thumbs.
Many of these primates also have toes that function as opposable thumbs. Sometimes called “opposable toes” these are useful for climbing. Some other animals have opposable thumbs or something similar to an opposable thumb. For example, opossums have toes on their hind feet that help them grip and climb. Giant pandas have a bony portion of their wrist bone that help them grasp bamboo to eat.
Do you know how important it is to have an opposable thumb? Try this fun activity to show how much more difficult tasks are without your thumb.
Directions
- Make a list of the items you chose and tasks for everyone to complete.
- Examples:
Pick up the paper or cloth
Zip and unzip the zipper
Button the button
Pick up the paperclip
Write your name on the paper
- Examples:
- Tape or tie your test subjects’ thumbs so that they cannot move. (One piece of tape or string around the palm should hold the thumb.)
- Have them complete the list of tasks that you have developed.
- Time them as they complete each task.
- Make a chart that lists the time for each task and crown the winner of the No Thumbs Race!
Manual Alphabet Sign Language
Learn About: sign language
Materials: none needed!
Did You Know?
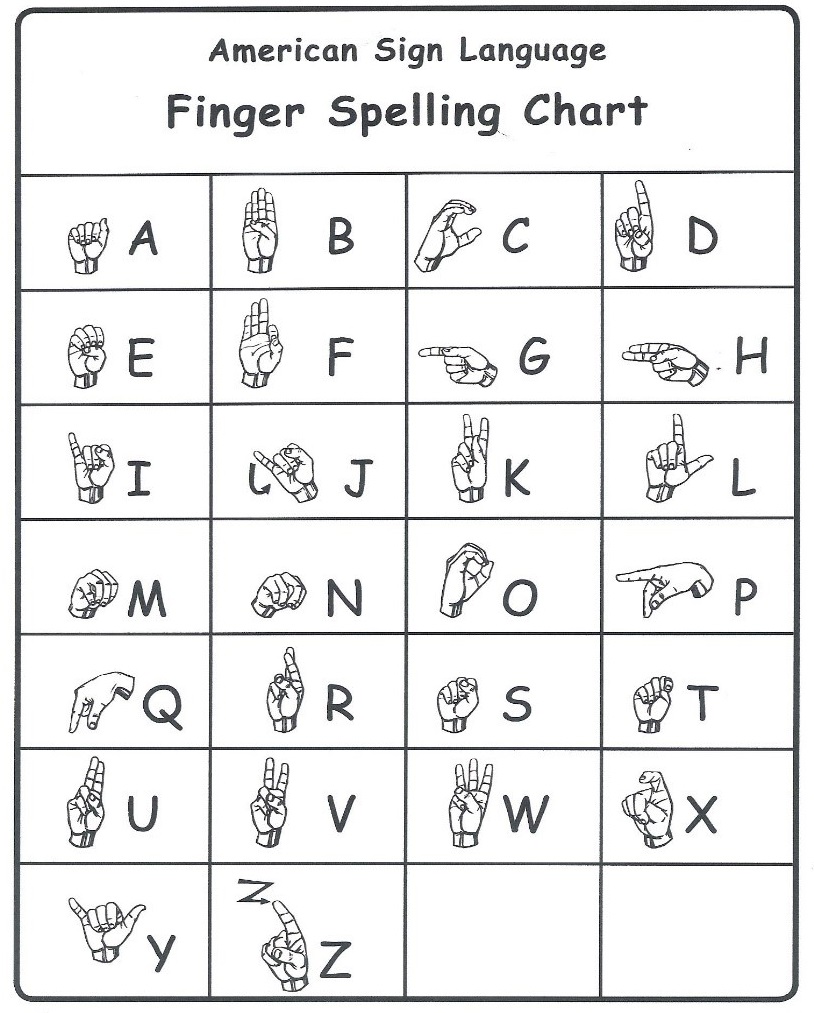
The Manual Alphabet is an alphabet in which finger positions represent the letters of the alphabet. It is used in-part for communication by hearing-impaired people.
Below is a diagram of the Manual Alphabet. Practice spelling your name and other words. Learn with a friend or family member and send messages using only your hands.
The Manual Alphabet is only a small part of the sign language used for communication by hearing-impaired people. Go online and explore other words and phrases you can learn using sign language. Try these sights for examples. https://www.youtube.com/watch?v=v1desDduz5M https://www.handspeak.com/word/most-used/)
Nitro Type
Learn About: typing
Materials: computer with keyboard and internet access
Click here to go to the Nitro Type learning game.
This fun learning game teaches users how to type faster and more accurately. Pick your racecar and type a sentence as fast (and accurate) as you can to speed up and win the race! Players can invite their friends to play and compete as well.
Memory Match: Famous Paintings
Learn About: art history, memory
Materials: device with internet access
Click here to play the memory match game.
Test your memory and learn about famous paintings and artists. Flip cards over to match the title and artist to the painting.
GET IN TOUCH WITH Department of Education
Department of Education
Education Building, Room 156
1731 SW Plass Ave.
Topeka, KS 66621
Phone & Email
Phone: 785.670.1427
